
Riding Comfortably: 9 Essentials for Adjusting Your Bike Seat
Adjusting the saddle height on your bike is one of the most important aspects of bike fit. It can affect your comfort, efficiency, performance, and injury prevention. However, finding the optimal saddle height can be challenging, as there are different methods, formulas, and factors to consider. In this article, we will explain why saddle height matters, how to measure and adjust it, and how to fine-tune it for your individual needs. Whether you are a beginner or an experienced cyclist, this guide will help you get the most out of your bike and your body.
We will cover some of the basic methods to set saddle height, such as the heel method, the Lemond method, and the Hamley and Thomas method. We will also discuss how saddle height affects your saddle position, such as the tilt, fore-aft position, and leg length. Finally, we will give you some tips on how to test and adjust your saddle height until you find the perfect one for you.

- For more information : click here
How to use Different method to adjust the Optimal saddle height:
Heel Method
The heel method involves placing your heel on the pedal and pedaling backwards until the crank arm is at the bottom position. Your knee should be fully straight, without tilting your hips or losing contact with the pedal. If your knee is bent, you need to raise the saddle slightly. If your heel loses contact with the pedal, you need to lower the saddle slightly. You can repeat this process until you find the optimal saddle height for you.
If you prefer a hassle-free approach without measurements, here’s a simpler option: Sit on your bike, turn a pedal downward, and rest your heel on it.
If your leg is comfortably stretched, your saddle height is just right. If not, easily adjust the saddle height until it feels perfect.

Lemond Method [Formula for calculating saddle height]
The Lemond method involves multiplying your inseam by 0.883 to get the saddle height measurement from the center of the bottom bracket to the top of the saddle.

Distance between centre of pedal bearing and top edge of saddle = step length x 0.885
These methods are based on averages and mathematics, so they may not give an accurate result for everyone. You should also consider other factors such as crank length, pedal type, shoe thickness, and personal preference.
Hamley and Thomas method
The Hamley and Thomas method is a way to adjust the saddle height on your bike based on the angle of your knee joint at the bottom of the pedal stroke. It can help you find the optimal saddle height for your comfort, efficiency, and performance. Here is how to use it:
- You will need a goniometer or a smartphone app that can measure angles, such as Bike Fast Fit or BikeFit.
- Sit on the bike with your feet on the pedals and the crank arms horizontal. Make sure your pelvis is level and your back is straight.
- Place the goniometer or the smartphone on the side of your knee, aligning the center of the device with the center of your knee joint. The device should have two arms or lines that can be adjusted to match the angle of your thigh and lower leg.
- Rotate the pedal backwards until the crank arm is at the bottom position. The device will show the angle of your knee joint at this point. The optimal angle is between 25 and 35 degrees, depending on your flexibility and pedaling style.
- If the angle is too small (less than 25 degrees), you need to lower the saddle slightly. If the angle is too large (more than 35 degrees), you need to raise the saddle slightly. You can use a ruler or a tape measure to adjust the saddle height by small increments, such as 5 mm or 10 mm.
- Repeat the process until you find the optimal angle for your knee joint. You can also test the saddle height by riding the bike and feeling how comfortable and efficient it is.
Plumb line Method
Using a plumb line: A plumb line is a string with a weight attached to the end. You can use it to measure the saddle fore-aft position, which is the distance of the saddle from the handlebars. It can affect your balance, stability, and aerodynamics on the bike. To use a plumb line, you need to sit on the bike with your feet on the pedals and the crank arms horizontal. Then, hold the plumb line over the front of your kneecap and let it hang down. The plumb line should intersect the pedal axle. If it falls behind or in front of the pedal axle, you need to adjust the saddle forward or backward accordingly.

Smartphone App
Using a smartphone app: A smartphone app is a software application that can help you measure and adjust the saddle height and position using your phone’s camera and sensors. There are different apps available, such as Bike Fast Fit, BikeFit, and SizeMyBike. To use a smartphone app, you need to follow the instructions on the app, which may vary depending on the app. Typically, you need to mount your phone on a tripod or a stable surface, and take a video or a photo of yourself riding the bike. Then, the app will analyze your posture, angles, and distances, and give you feedback and recommendations on how to adjust your saddle height and position.
7 tips on how to set a comfortable and efficient riding position
7 tips on how to set a comfortable and efficient riding position by adjusting the seat and handlebar height, reach, and angle, and how to choose the right saddle and handlebar shape for your anatomy and preference.
- Adjust the seat height so that your knee is slightly bent at the bottom of the pedal stroke, without rocking your hips or losing contact with the pedal. You can use the heel method, the Lemond method, or the Hamley and Thomas method to find the optimal seat height for you.
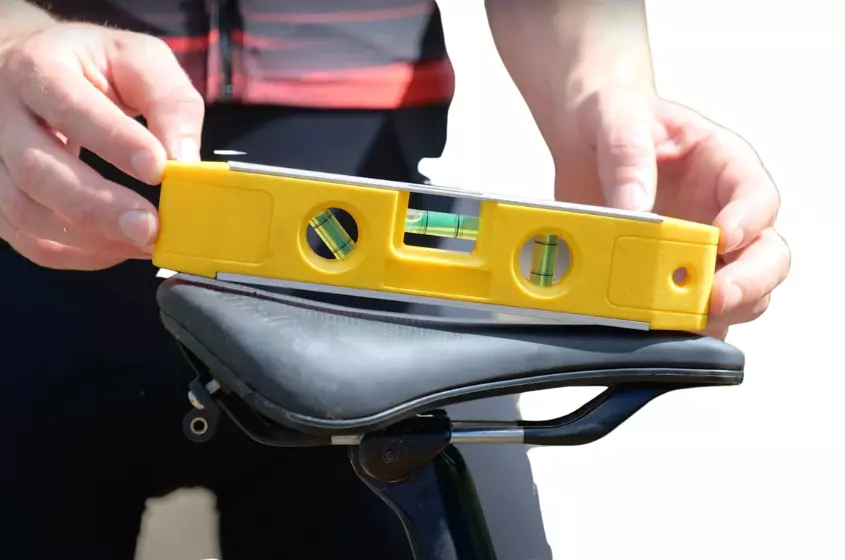
- Adjust the seat tilt so that it is level or slightly nose down, depending on your comfort and preference. You can use a spirit level, a broom handle, or a smartphone app to measure and adjust the seat tilt.
- Adjust the seat fore-aft position so that the plumb line from your kneecap intersects the pedal axle when the crank arm is horizontal. You can use a plumb line, a ruler, or a smartphone app to measure and adjust the seat fore-aft position.
- Adjust the handlebar height so that it is comfortable for your back, neck, and shoulders. You can raise or lower the handlebar by adding or removing spacers under the stem, or by flipping the stem upside down. You can also use a different stem length or angle to change the handlebar height.
- Adjust the handlebar reach so that it is comfortable for your arms, wrists, and hands. You can move the handlebar closer or farther away by changing the stem length or angle, or by sliding the brake levers and shifters along the handlebar. You can also use a different handlebar width or shape to change the handlebar reach.
- Choose the right saddle shape for your anatomy and preference. You can use a flat, wave-shaped, or cut-out saddle, depending on your comfort, pressure distribution, and freedom of movement. You can test different saddles and see what suits you best.
- Choose the right handlebar shape for your riding style and preference. You can use a drop, flat, or riser handlebar, depending on your aerodynamics, control, and comfort. You can also use different handlebar tape or grips to improve your comfort and grip.
how to set correct saddle angle
Setting the correct saddle angle is important for your comfort and performance on the bike. A saddle that is too high or too low can cause problems such as lower back pain, knee pain, neck pain, wrist pain, poor pedaling technique, and reduced efficiency.
To find the optimal saddle angle for you, you need to measure your pubic bone height (PBH), which is the distance from your pubic bone to the floor. You can use a measuring tape, two paint sticks, and some adhesive tape to do this.
Then, you need to calculate your saddle height, which is the distance from the bottom bracket of your bike to the top of the saddle. You can do this by subtracting 10 to 10.5 centimeters from your PBH. For example, if your PBH is 84 centimeters, your saddle height would be 73.5 to 74 centimeters.
Adjusting the angle on seatposts with a single clamp bolt
Making adjustments to the angle on seatposts equipped with a single clamp bolt involves dealing with multiple grooves that secure the saddle in position. The stability of the connection is achieved through the clamping force of the bolt. To alter the saddle angle, simply loosen the clamp bolt, allowing the grooves to become loose. With a slight lift of the clamping plates, you can then easily make adjustments to the saddle angle.

Adjusting the angle on seatposts with two clamp bolts
Finally, you need to adjust the seat position and tilt to make sure you are comfortable and balanced on the bike. You can use a plumb bob or a string with a weight to check the alignment of your knee and pedal. The plumb bob should hang from the front of your knee and touch the center of the pedal axle when your foot is at the 3 o’clock position. To change the seat position, you need to loosen the seat fixing bolt underneath the seat and slide it forward or backward. To change the seat tilt, you need to loosen the same bolt and angle the seat up or down.

Assessing Your Current Bike Seat Position & Adjust Your Bike Seat
So you’ve been riding your bike for a while but something just feels off. Chances are, your seat isn’t adjusted properly for your body and riding style. Make some changes and you’ll be cruising comfortably in no time.
Assessing Your Current Bike Seat Position
First, go for a quick spin on your usual route. Pay attention to any pain or discomfort in your hips, back, knees or neck. An incorrectly positioned seat can strain your body, so note where you feel tension.
Next, check your seat height. When pedaling, your leg should be almost fully extended at the bottom of the pedal stroke. If your hips rock side to side, the seat is too high. If your knees ache, it’s too low. Adjust and recheck until your leg remains slightly bent when extended.
Consider the seat tilt. Tilting the seat slightly up or down can relieve pressure. Try increments of 3 degrees at a time.
Don’t forget seat fore/aft position. When the pedal is forward and your heel is on it, your knee should be directly over the pedal spindle. If not, loosen the seat clamp and slide the seat forward or back.
Finally, think about a new seat. If you’ve tried adjusting your current seat to no avail, it may not suit your anatomy. Try different seat widths and padding levels until you find “the one.”
With a few tweaks to your seat height, tilt, and position, you’ll be cruising in comfort. And if needed, a new seat can make all the difference.
Adjusting your Bike Seat Height for Proper Leg Extension
To ride comfortably, your bike seat height needs to be adjusted properly for your leg extension. If it’s too low, your knees will ache. Too high and your hips will hurt. Get it just right and you’ll glide smoothly for miles.
First, straddle your bike while holding onto something for balance. Place your heel on the pedal at the bottom of the pedal stroke. Your leg should be almost fully extended.
For most riders, the ideal seat height allows a slight bend in the knee at the bottom of the pedal stroke.
If your leg is still bent a lot, raise the seat. Loosen the seat post clamp, pull the seat up an inch at a time, and re-tighten. Repeat until your leg is slightly bent. Conversely, if your hips rock side to side as you pedal or your leg is overextended, lower the seat in increments.
Second, make sure the seat is level for maximum comfort. An uneven seat can lead to back pain and saddle sores. Loosen the seat clamp and adjust the seat angle until it’s perfectly horizontal. Re-tighten the clamp securely.
Finally, consider a seat that fits your body and riding style. A wider seat with ample padding is good for casual riding. Narrow, lightly padded seats are best for long distance cycling. Try out different seat types to find your perfect match.
With the right seat height and a seat tailored to you, cycling will feel smooth and natural. You’ll be gliding comfortably for miles in no time. Tweak as needed and happy riding.
Finding the Optimal Fore/Aft Position for Comfort and Efficiency
To ride comfortably for long distances, finding the optimal fore/aft position of your bike seat is key.
Adjusting Your bike Seat
Loosen the bolt under your bike seat that clamps it to the seat post. Move the seat forward or backward along the rails, then tighten the bolt at your new preferred position.
For most riders, a good starting point is to have your knee slightly bent when your heel is on the pedal at the bottom of the pedal stroke. Your leg should still have a slight bend to it when fully extended. If your leg is completely straight or your knee is still sharply bent, your seat is too far forward or too backward, respectively.
Ride around and pay attention to how your knees, hips and lower back feel. If you experience discomfort in any of these areas after a few miles, your seat may need further adjusting. It can take some trial and error to find your personal sweet spot.
Can you recommend some good bike saddles for long rides?
- Fizik Arione R3 Open: This is a long-nosed saddle with a cut-out that provides pressure relief and support for long-distance riders. It has a carbon-reinforced nylon shell and K:ium rails that offer strength and durability. It comes in two widths: regular (130 mm) and large (142 mm).
- Specialized Power Expert: This is a short-nosed saddle that allows you to adopt a more aggressive and aerodynamic position on the bike. It has a Body Geometry design that features a cut-out and a wide rear section that support your sit bones and blood flow. It has a carbon shell and titanium rails that provide stiffness and comfort. It comes in three widths: 143 mm, 155 mm, and 168 mm.
- Brooks Cambium C15 Carved All Weather: This is a classic saddle that combines a vulcanized rubber top and a nylon cover that are weather-resistant and durable. It has a cut-out that reduces pressure and enhances comfort. It has steel rails that add strength and stability. It comes in one width: 140 mm.
- Selle Italia SLR Boost Endurance Superflow: This is a 3D printed saddle that uses a special material called Fibra-Tek that is soft, breathable, and adaptive. It has a short nose and a large cut-out that improve comfort and performance. It has a carbon shell and rails that offer lightness and stiffness. It comes in two sizes: S3 (130 x 248 mm) and L3 (145 x 248 mm).
Factors that affect your saddle height and position
I can describe the factors such as crank length, pedal type, shoe thickness, and personal preference that affect your saddle height and position. Here they are:
- Crank length is the distance from the center of the bottom bracket to the center of the pedal axle. It can affect your pedaling efficiency, comfort, and power output. Longer cranks can provide more leverage and torque, but they also require more leg extension and hip flexion, which can strain your knees and lower back. Shorter cranks can reduce the stress on your joints and enable a higher cadence, but they also reduce the force you can apply on the pedals. The optimal crank length depends on your leg length, flexibility, riding style, and preference.
- Pedal type is the mechanism that connects your feet to the pedals. It can affect your stability, comfort, and power transfer. There are different types of pedals, such as platform, toe clip, and clipless. Platform pedals are flat and allow you to wear any shoes, but they also offer less grip and control. Toe clip pedals have a metal or plastic cage that wraps around your toes, but they also limit your foot movement and can be difficult to get in and out of. Clipless pedals have a cleat on the bottom of your shoes that locks into the pedal, but they also require compatible shoes and pedals, and can be tricky to unclip. The optimal pedal type depends on your skill level, riding style, and preference .
- Shoe thickness is the height of your shoes from the sole to the top of the foot. It can affect your effective leg length and saddle height. Thicker shoes can increase your leg length and require a higher saddle, while thinner shoes can decrease your leg length and require a lower saddle. The optimal shoe thickness depends on your comfort, efficiency, and preference .
Some other signs your seat may be too far forward or backward:
- Knee Pain: When you sit too far forward, it can lead to excessive bending of the knees, which can cause discomfort and knee pain over time.
- Hip Discomfort: Seating too far backward often forces your hips to rock from side to side, resulting in hip discomfort and potential long-term issues.
- Lower Back Pain: Your seat’s position plays a crucial role in your lower back health. Sitting too far forward or backward can force your back into an unnatural posture, leading to lower back pain.
- Numbness: Sitting too far forward can exert pressure on nerves and blood vessels, leading to numbness and tingling sensations in your legs and buttocks.
- Overreaching Point: If you frequently experience the need to overreach for the handlebars, it clearly indicates that your seat is positioned too far backward, potentially leading to strain in your arms, shoulders, and upper back.
With some minor adjustments, you’ll be riding comfortably for miles to come. The ideal seat position for cycling efficiency and comfort is worth the effort to find.
Conclusion
So there you have it, the basics to make sure you’re riding in comfort and avoiding soreness. By taking the time to adjust your bike seat properly, you’re setting yourself up for many enjoyable rides ahead. Don’t forget, your bike is designed to work with your body, not against it. Make incremental changes and test them out you’ll know when it’s “just right”. And if discomfort persists, it may be a sign you need a different seat altogether or should check in with your doctor. The most important thing is that you get out there, feel the wind in your face, and appreciate all the places your bike can take you. Happy riding.